

How to Enable Secure Boot: A Step-by-Step Guide
To enable Secure Boot, access your computer’s BIOS settings and follow the steps to enable Secure Boot from the Security or Boot tab. In today’s digital landscape, ensuring the security of your computer is of utmost importance.
One way to enhance security is by enabling Secure Boot, a feature that verifies the integrity of the operating system during startup. This prevents unauthorized software or malware from hijacking the boot process and compromising your system. By following a few simple steps within your computer’s BIOS settings, you can enable Secure Boot and bolster your system’s defenses against potential threats.
In this blog post, we will guide you through the process of enabling Secure Boot, providing you with the necessary information to protect your computer and keep your data safe.
:max_bytes(150000):strip_icc()/disablesecureboot02-c88e3bc90b4d466e9dd986b35da01a04.jpg)
Credit: www.lifewire.com
Introduction To Secure Boot
Secure Boot is an essential feature that enhances the security of your computer system. Enabling Secure Boot protects your device from unauthorized software and ensures a secure boot process, safeguarding against malware and other threats.
Secure Boot is a security feature in modern computer systems that ensures the integrity of the operating system and prevents malware from tampering with the boot process. It is a firmware-based technology that checks the digital signature of each component loaded during the boot process, including the bootloader, kernel, and drivers. If any component fails the verification process, Secure Boot prevents the system from booting, thus preventing unauthorized access and protecting the system from malware attacks.
The Role Of Secure Boot In System Security
Secure Boot is a critical component of system security that helps protect against various types of malware attacks, including rootkits, bootkits, and other forms of malicious software. By verifying the digital signature of each component loaded during the boot process, Secure Boot ensures that only trusted software is executed, thus reducing the risk of malware infection and unauthorized access to the system.
Benefits Of Enabling Secure Boot
Enabling Secure Boot provides several benefits, including:
- Enhanced Security: Secure Boot protects the system from malware attacks and unauthorized access, thus enhancing system security.
- Trusted Execution: Secure Boot ensures that only trusted software is executed during the boot process, reducing the risk of malware infection.
- Compliance: Many security regulations and standards, such as HIPAA and PCI DSS, require the use of Secure Boot to protect sensitive data.
- Compatibility: Secure Boot is supported by most modern operating systems, including Windows, Linux, and macOS.
In conclusion, enabling Secure Boot is a critical step in enhancing system security and protecting against malware attacks. By verifying the digital signature of each component loaded during the boot process, Secure Boot ensures that only trusted software is executed, reducing the risk of malware infection and unauthorized access.
Prerequisites Before Enabling Secure Boot
Before enabling Secure Boot, ensure that the computer’s firmware supports it and that the operating system is compatible. Check for any hardware or software that may not work with Secure Boot enabled, and back up important data as a precaution.
Checking System Compatibility
To enable Secure Boot, ensure your system is compatible with the feature.
Backing Up Important Data
Always back up crucial data before enabling Secure Boot to prevent data loss.
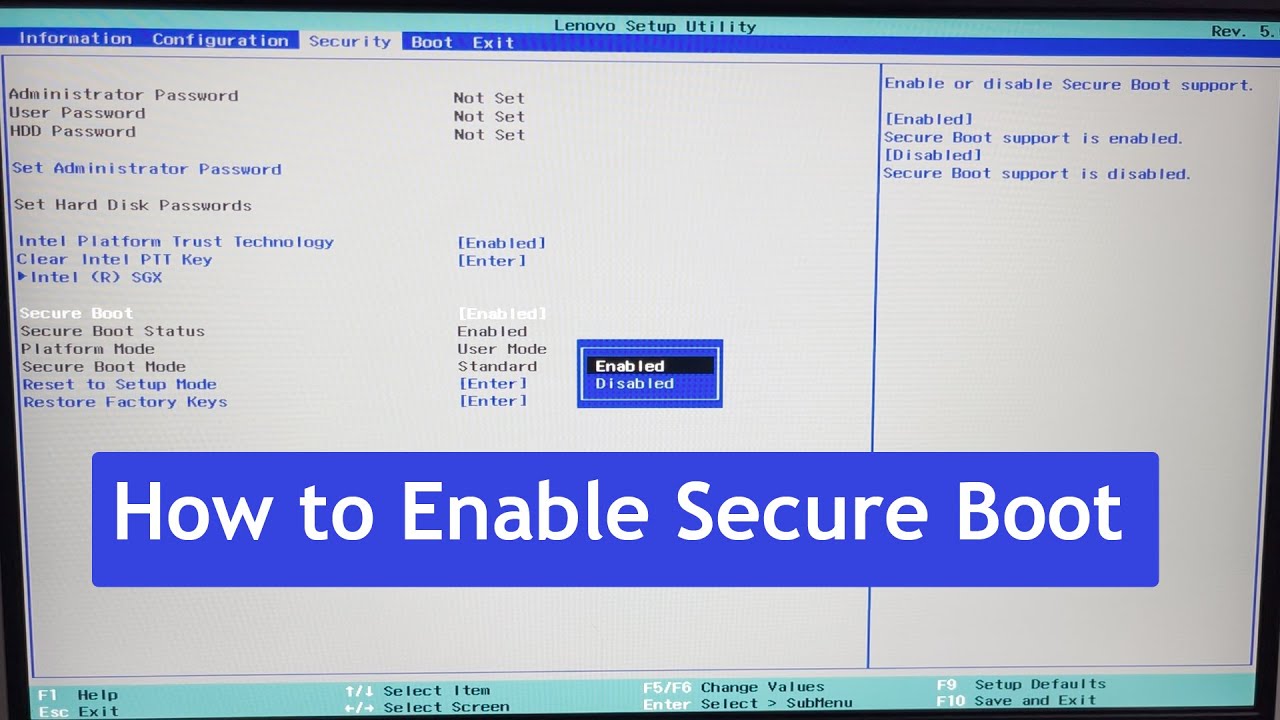
Entering The Bios Or Uefi Settings
To enable Secure Boot, you need to enter the BIOS or UEFI settings. First, access the settings by pressing a key during the boot process. Then, navigate to the Secure Boot option and enable it to enhance your system’s security.
Entering the BIOS or UEFI settings is an essential step in enabling Secure Boot on your computer. This process allows you to access the firmware interface and make the necessary changes to ensure your system’s security. In this section, we will guide you through the steps of restarting your computer and accessing the BIOS/UEFI interface.
Restarting Your Computer
To begin, you need to restart your computer. This can be done by clicking on the “Start” menu in the bottom left corner of your screen and selecting the “Restart” option. Alternatively, you can press the Windows key on your keyboard, followed by the power icon, and then click on “Restart.” Once you initiate the restart process, your computer will shut down and boot up again. It is important to note that some computers may require you to press a specific key or combination of keys to access the BIOS/UEFI settings. This leads us to the next step.
Accessing The Bios/uefi Interface
After your computer restarts, you need to access the BIOS/UEFI interface. To do this, pay close attention to the startup screen. It usually displays the manufacturer’s logo or a brief message indicating which key you should press to enter the BIOS/UEFI settings. Commonly used keys for accessing the BIOS/UEFI interface include F2, F10, Del, or Esc. However, it may vary depending on your computer’s manufacturer. Once you identify the correct key, press it repeatedly until the BIOS/UEFI interface appears. If you are unsure about the specific key for your computer, you can refer to the manufacturer’s website or the user manual that came with your device. These resources should provide detailed instructions on how to enter the BIOS/UEFI settings. After successfully entering the BIOS/UEFI interface, you will have access to various settings and options. Look for the section related to Secure Boot, which is usually located under the “Security” or “Boot” tab. From there, you can enable Secure Boot and make any other necessary adjustments to enhance your system’s security. Remember to save your changes before exiting the BIOS/UEFI interface. You can usually do this by selecting the “Save and Exit” or a similar option. Once you have saved the changes, your computer will restart again, and Secure Boot will be enabled. By following these steps and accessing the BIOS/UEFI settings, you can easily enable Secure Boot on your computer. This added layer of security helps protect your system from unauthorized access and ensures a safer computing experience.
Navigating The Bios/uefi Interface
Enabling Secure Boot is a crucial step in navigating the BIOS/UEFI interface. By following the necessary steps, you can enhance the security of your system and protect it from unauthorized software and malware. Safeguard your device with this essential feature.
Navigating the BIOS/UEFI Interface can be a daunting task for many users. However, it is a crucial step when it comes to enabling Secure Boot on your system. In this guide, we will walk you through the process of navigating the BIOS/UEFI interface to enable Secure Boot.
Locating The Secure Boot Option
The first step in enabling Secure Boot is to locate the Secure Boot option in your BIOS/UEFI interface. The location of this option varies depending on the motherboard manufacturer and the BIOS/UEFI version. However, it is usually found under the Security or Boot tabs.
Understanding Different Bios/uefi Layouts
Different motherboard manufacturers have different BIOS/UEFI layouts. Some may have a simple interface with basic options, while others may have a more complex interface with advanced options. It is important to understand the layout of your BIOS/UEFI interface to navigate it effectively. To help you navigate the BIOS/UEFI interface, we have provided some tips below:
- Use the arrow keys to navigate up and down in the BIOS/UEFI interface.
- Press Enter to select an option.
- Press Esc to go back to the previous menu.
If you are unsure about any options in your BIOS/UEFI interface, refer to the motherboard manual or contact the manufacturer for assistance. Enabling Secure Boot is an essential step in securing your system from malicious attacks. By following the steps outlined above, you can navigate the BIOS/UEFI interface with ease and enable Secure Boot on your system.
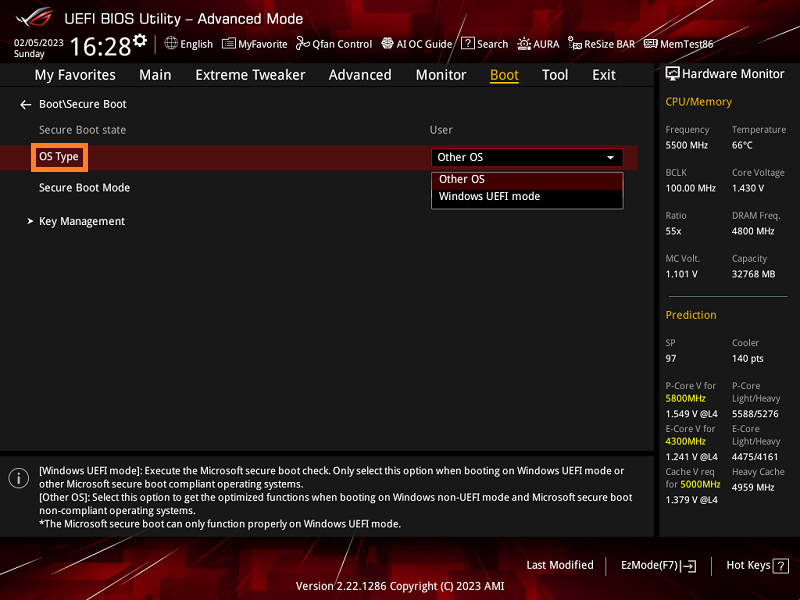
Configuring The Secure Boot Setting
Configuring the Secure Boot setting is an essential step in ensuring the security of your system. By enabling Secure Boot and selecting the correct key management mode, you can protect your device from unauthorized code execution and mitigate the risk of malware attacks. In this guide, we will walk you through the process of configuring the Secure Boot setting to enhance the security of your system.
Enabling Secure Boot
Enabling Secure Boot is the first step in enhancing the security of your system. Secure Boot helps prevent unauthorized operating systems and bootloaders from loading during the startup process. To enable Secure Boot:
- Access the UEFI/BIOS settings of your system.
- Navigate to the Secure Boot configuration section.
- Enable the Secure Boot option.
- Save the changes and exit the UEFI/BIOS settings.
Selecting The Correct Key Management Mode
When configuring the Secure Boot setting, it is important to select the correct key management mode to ensure the integrity of the boot process. The two key management modes are:
| Key Management Mode | Description |
|---|---|
| Standard | Allows the use of only platform and authorized key databases. |
| Custom | Enables the creation and management of custom secure boot keys. |
Choose the appropriate key management mode based on your specific security requirements and organizational policies.
Credit: www.asus.com
Handling Operating System Compatibility
When it comes to enabling secure boot, handling operating system compatibility is an essential aspect to consider. Ensuring that the operating system (OS) supports secure boot and troubleshooting any boot issues are crucial steps in the process. In this section, we will explore how to identify OS secure boot support and troubleshoot OS boot issues.
Identifying Os Secure Boot Support
Before enabling secure boot, it is important to determine if your operating system supports this feature. Here are some steps to help you identify OS secure boot support:
- Check the official documentation: Refer to the documentation provided by the OS manufacturer to see if secure boot is supported.
- System requirements: Review the system requirements for the specific OS version you are using. Look for any mentions of secure boot compatibility.
- Online forums and communities: Explore online forums and communities where users discuss their experiences with secure boot and specific OS versions. This can provide valuable insights into whether secure boot is supported.
By following these steps, you can determine if your operating system supports secure boot.
Troubleshooting Os Boot Issues
If you encounter boot issues after enabling secure boot, it is important to troubleshoot the problem. Here are some common steps to help you troubleshoot OS boot issues:
- Check compatibility: Ensure that the OS version you are using is compatible with secure boot. Sometimes, older OS versions may not fully support this feature.
- Disable conflicting settings: Verify that there are no conflicting settings in the BIOS or UEFI firmware that could interfere with secure boot. Disable any unnecessary options that might cause conflicts.
- Update drivers and firmware: Keep your drivers and firmware up to date to ensure compatibility with secure boot. Check the manufacturer’s website for any available updates.
- Perform a clean install: If all else fails, consider performing a clean install of the operating system. This can help resolve any underlying issues that may be causing boot problems.
By following these troubleshooting steps, you can overcome OS boot issues and ensure a smooth and secure boot process.
Finalizing The Process
Once you have enabled Secure Boot, follow these crucial steps to complete the process successfully.
Saving Changes And Exiting The Bios/uefi
- Locate the ‘Save Changes and Exit’ option in BIOS/UEFI.
- Press the corresponding key (often F10) to save changes.
- Confirm saving changes when prompted.
- Choose ‘Yes’ to exit BIOS/UEFI.
Verifying Secure Boot Activation
- Restart your system to apply the changes.
- Enter BIOS/UEFI settings again.
- Look for the Secure Boot status to ensure activation.
- If enabled, you have successfully finalized the Secure Boot setup.
Advanced Considerations
To ensure a secure boot process, advanced considerations must be taken into account. Implementing secure boot helps prevent unauthorized firmware, drivers, or operating systems from loading during startup, enhancing overall system security. Properly enabling secure boot is essential for safeguarding against potential threats and ensuring a trusted boot environment.
Updating BIOS/UEFI for Better Support Keep your BIOS/UEFI updated for optimal Secure Boot performance. Managing Secure Boot with Dual-Boot Systems Ensure Secure Boot compatibility with dual-boot setups.
Troubleshooting Common Secure Boot Issues
When enabling Secure Boot, users may encounter common issues that can affect the system’s functionality. By understanding how to troubleshoot these problems, users can ensure their system is secure and running smoothly.
Resolving Compatibility Problems
If encountering compatibility issues during Secure Boot setup, ensure all hardware components are UEFI-compatible.
- Check for firmware updates for the motherboard and other hardware.
- Verify that all drivers and software are up to date.
- Disable legacy boot options in the BIOS settings.
Recovering From Incorrect Settings
If the system fails to boot after Secure Boot activation, access the BIOS setup and disable Secure Boot temporarily.
- Boot into the system and update any outdated drivers or firmware.
- Re-enable Secure Boot after verifying system stability.
- Perform a system restore to revert to previous settings if necessary.
Maintaining System Security Post-enablement
Maintaining system security post-enablement is crucial to ensure the safety of your device and data. Enabling secure boot is an effective way to enhance system security by verifying the digital signature of boot components, preventing the loading of unauthorized software.
Regularly updating and patching the system can further strengthen security measures.
Maintaining System Security Post-Enablement Regularly Updating Firmware and Software Ensuring your system’s firmware and software are up to date is crucial. By regularly updating, you patch security vulnerabilities promptly. Best Practices for Secure System Management Implement these practices to bolster your system’s security: 1. Utilize strong passwords and enable multi-factor authentication. 2. Restrict user access based on need and principle of least privilege. 3. Regularly review system logs for suspicious activities. 4. Conduct periodic security audits to identify weaknesses.
Credit: softkeys.uk
Frequently Asked Questions
What Is Secure Boot And Why Is It Important?
Secure Boot is a security feature that helps prevent unauthorized operating systems and malware from loading during the system start-up process. It ensures that only digitally signed, trusted software is executed, thereby enhancing the overall security of the system.
How Do I Check If Secure Boot Is Enabled On My Computer?
To check if Secure Boot is enabled, restart your computer and access the BIOS/UEFI settings. Navigate to the Secure Boot option and verify if it’s enabled. If it’s enabled, the status will be displayed as “Enabled. ” If not, you can enable it from the BIOS/UEFI settings.
Can I Enable Secure Boot On An Older Computer?
Secure Boot requires a UEFI firmware, so it’s typically found in newer computers. If your computer uses the older BIOS system, Secure Boot may not be available. However, some older systems can be updated to support UEFI and Secure Boot, but it’s recommended to consult with the manufacturer first.
Conclusion
Incorporating Secure Boot adds an extra layer of protection to your system, safeguarding it from unauthorized access and malware threats. By following the simple steps outlined in this guide, you can ensure that your device is secure and operating at its best.
Embracing Secure Boot is a fundamental aspect of maintaining a safe and reliable computing environment.